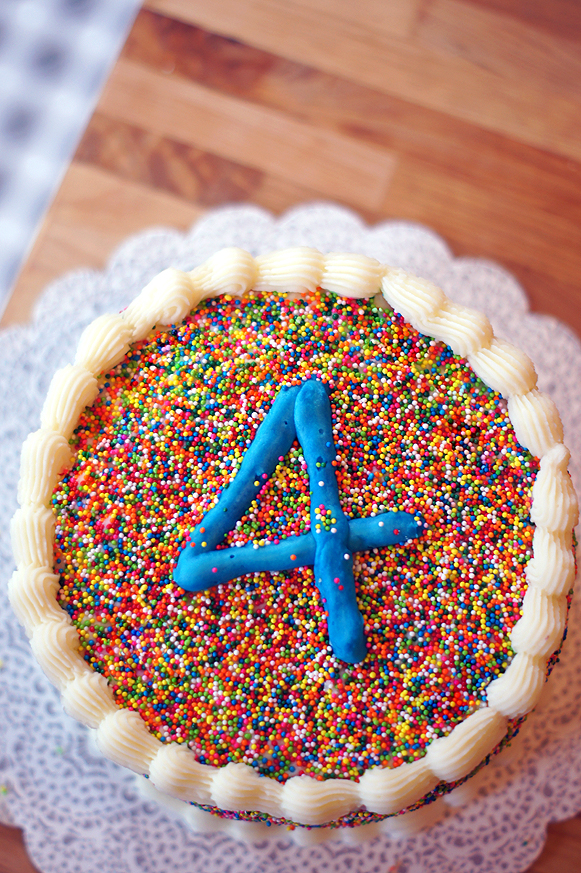
My nephew’s 4th birthday fell on Easter this year, and even though we’re throwing a party for him in a couple of weeks (Superhero themed! Cannot wait!) I decided that the kid only turns four once and shouldn’t miss out on birthday cake, regardless of how generous the Easter Bunny was. 🙂 (and gosh, was he generous this year!)
This cake was a blast to make – first I baked a funfetti-style cake featuring a ton of sprinkles and copious amounts of the vanilla my MIL brought back from Mexico. The entire house smelled SO good while it was baking. Usually I hate trimming and torting, but it gave me an excuse to sample the scraps and well, let’s just say it was tasty enough to make me pretty enthusiastic about having to trim a little excess! 😉 Since we already had another dessert for the day, I basically made half of a regular layer cake’s amount of batter. This works beautifully for 6×3″ rounds, but you’ll need to double the recipe if you want to use something a little more standard like 8×2″ or 9×2″.
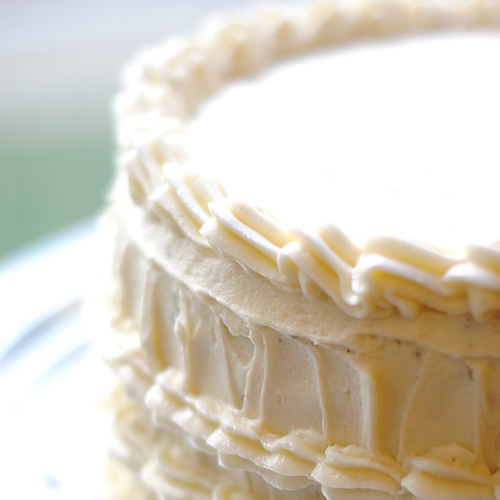
To decorate, I made my favorite buttercream, spread it smoothly over the assembled layers, and then applied entirely too many sprinkles! I’ve seen a few tutorials that suggest that you should fill a large pan or sheet tray with sprinkles and roll the cake around. That will work, but being that level of rough with a cake scares the bejeezus out of me, AND it wastes a ton of sprinkles because you run the risk of leaving pieces of spoiled frosting in with your excess sprinkles which is something I’m against. #savethesprinkles
The way I applied my sprinkles is super easy, minimizes waste, and is much less nerve wracking. First, cut a small piece of wax paper. The best size for your cake will vary based on the number of (height of) layers, layer size, and level of detail (covering a cake versus making a pattern or filling a specific area) but for this cake I mostly used a 2×3″ strip of wax paper. Then take cooking spray (in my case a Misto filled with avocado oil) and gently spray a small amount on the wax paper. If you’re using something like Pam you can move on, but if you’re using a Misto, or don’t have spray oil, you’ll need to even out the oil and spread it into a thin layer using your finger. Next, place the oiled wax paper in a bowl oil side up, and using a teaspoon, sprinkle the sprinkles onto the wax paper. Gently shake the wax paper back and forth until the sprinkles form an even layer 1-sprinkle deep. Now, the magic – pick up the wax paper, allowing any excess sprinkles to fall off into your bowl. Then, place the wax paper on the frosted cake, sprinkle side down, and gently rub on the back of the paper. The sprinkles will release from the oil, and stick to the frosting. Simply repeat this process until the cake is covered, or your pattern has been achieved! You can even cut your wax paper into fancy shapes to make a sprinkle stamp. How cool is that?!
Once I was done sprinkling I finished the cake by piping a simple border with the untinted base icing using an open star tip (Wilton #199) and piped a numeral 4 in icing tinted blue (McCormick Assorted NEON) using a large round tip (Ateco #804.)
I loved how this cake turned out, and could imagine doing similar things for any holiday, or perhaps using jimmies rather than nonpareils. What a fun cake for a four year old’s birthday… or any time!

- 1 and 2/3 cup ultragrain flour
- 1/2 teaspoon baking powder
- 1/4 teaspoon baking soda
- 1/2 teaspoon salt
- 1/2 cup unsalted butter melted
- 3/4 cup granulated sugar
- 1/4 cup light brown sugar packed
- 1 large egg
- 1/4 cup sour cream
- 3/4 cup milk
- 1 tablespoon vanilla extract
- 1/2 cup sprinkles
- 1 1/2 c salted butter
- 1 dash salt
- 1 1/2 tbsp almond emulsion
- 2 lb powdered sugar
- 2 tbsp milk of your choice
- 1/2 cup nonpareils
-
Preheat oven to 350. Line the bottoms of two 6"x3" round pans with parchment paper, then grease bottom and sides. Set aside. Combine dry ingredients and set aside. Melt butter, then whisk together with sugars. Add egg, sour cream, milk, and vanilla and mix until combined. Slowly add dry ingredients and mix until no lumps remain. Add sprinkles, stir gently, being careful not to overmix. Pour evenly into prepared pans. Bake for 25-30 minutes or until cakes test done with a toothpick. Cool completely.
-
Using a stand mixer with paddle attachment, mix together butter, salt, and extract until well blended. Gradually add powdered sugar one cup at a time and whip vigorously. Gradually add milk until desired texture is reached.
-
First, cut a small piece of wax paper. Then take cooking spray and gently spray a small amount on the wax paper. Spread the oil into a thin layer using your finger. Next, place the oiled wax paper in a bowl, and using a teaspoon, sprinkle the sprinkles onto the wax paper. Gently shake the wax paper back and forth until the sprinkles form an even layer 1-sprinkle deep. Gently pick up the wax paper, allowing any excess sprinkles to fall off into your bowl. Finally, place the wax paper on the frosted cake, sprinkle side down, and rub on the back of the paper. The sprinkles will release from the oil, and stick to the frosting. Use excess icing to pipe a border or sentiment.
Recipe and photos from Mayhem in the Kitchen!
https://mayheminthekitchen.com
Cake recipe adapted from Sally's Baking Addiction.


hi there,
your cake is beautiful! i’m hoping to recreate this for my daughter’s birthday next week : ) would you recommend i bake the cake the night before and frost/sprinkle too? or should i wait until the morning of to do the frosting and sprinkles? i want sure if the sprinkle colors will start to bleed if i did it too soon.